There
is a
not uncommon belief that making bread is difficult, and not a task
for novice cooks. This idea has been put about by the Bakers’
Guild since 1256 AD to encourage people to buy from bakeries rather
than do it at home. It was reinforced by Charles II who didn't want
his many lady friends spending time in the kitchen that could be
devoted to him instead. And recently further enforced by an army of
self-diagnosed gluten intolerants. Assuming you are none of the
above, read on.
The best
bread is made by angry cooks. This is not due to any mystical
transference of psychic energies, it’s just that an angry cook
is apt to want to thump something, and the more you thump (knead)
bread dough, the finer the cooked loaf's crumb will be. Some of my
best loaves have been made after an afternoon's frustrating phone
calls to a service centre of some sort.
To make
your own bread you will need about 20 minutes of labor, plain flour,
sugar, yeast, water, some sort of oil (butter, olive, canola, etc),
salt and a 12-gauge shotgun
Put two
cups of warm water in a big bowl. This should be no warmer than you
would bath a baby in. Sprinkle a sachet or a heaped teaspoon of dry
yeast on the water, or a teaspoon sized lump of fresh yeast. Stir in
a teaspoon of sugar and two cups of plain white flour, or whole wheat
or multigrain flour if you prefer, with a large sturdy spoon--wooden
ones are ideal. Leave the mix covered with a tea-towel while you do
something else for a while. (The tea towel is to keep out kamikaze
insects, passing sparrows, adventurous mice and so on—but maybe
you don't live out in the country where these are very likely
visitors).
Later,
when the mixture in the bowl smells like beer and looks like a horror
film's depiction of a haunted swamp, stir in two tablespoons of
melted butter, vegetable oil, or olive oil; a teaspoon of salt, and
as much more plain flour as you can put in before the dough gets too
stiff to stir.
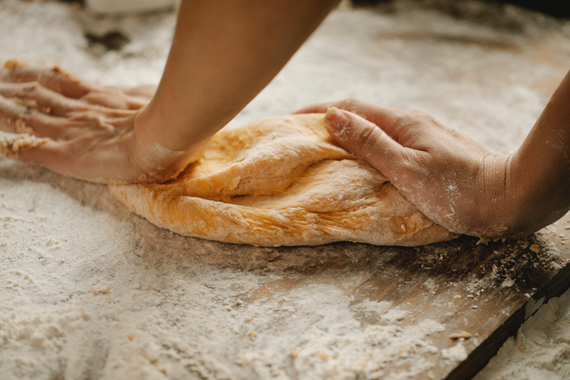
Dump the
dough onto a large working surface which you have sprinkled with
flour. Knead the dough by pulling the lump towards you and then
putting the heels of your hands down into the lump and pushing it
away. Turn the lump a quarter turn at each maneuver. Repeat the
process for five or ten minutes, or until exhaustion sets in,
scattering more flour on the lump if it sticks to you or the work
surface.
This is
where being angry comes in--the more you want to thump someone, the
more you’ll enjoy thumping and pushing and pulling the dough. And the
more you do that, the finer the grain of the cooked bread
will be, because you’re breaking up the yeast colonies, and
they’re what makes the air bubbles in the bread. You're also
activating the gluten, which improves the texture. (No
correspondence about the evils of gluten will be entered into. The
three million Americans who have celiac disease won't be reading this
story; they will be making gluten-free bread with their own recipes.)
The bread
dough will be too stiff to knead after a while. Cover it with the
mixing bowl or a damp tea towel or a piece of saran-wrap and leave it
to rest for an hour or so. It will become spongy from the yeast
activity, and increase in bulk. Knead it again for as long as you
like. Unlike pastry, bread dough is improved by handling. The
second kneading is not mandatory. If you prefer your bread with
larger air pockets, or you are worn out from the effort, skip the
second kneading.
Form the
dough into a rectangle and put it in a large greased loaf pan. Or a
non-stick loaf pan. Or a loaf pan lined with baking paper. (If you
prefer rolls, cut the dough into as many chunks as you like and form
them into circles or rectangles or some sort of pillow shape. Put
them on a cookie sheet with space between to expand. Spray with
edible oil so they won't form a tough skin before rising.)
Brush some
oil or milk on the top of the loaf. Let it sit until it has begun to
rise and get spongy, and about doubled in height. Bung it into a
200º centigrade/ 400º Fahrenheit oven for half an hour, and
then reduce heat to 170C/340F for another fifteen or twenty minutes.
It's hard to be exact about cooking times, as every stove has its own
characteristics. Rolls, being smaller than loaves, will take only 15
or 20 minutes total.
Bread is
done when it is golden brown and it gives out a hollow “thonk”
when tapped with a knuckle. Tip it out onto a cooling rack. Your
kitchen should now smell wonderful, and the family will beg you to
cut the bread. Don’t give in: the bread’s texture is
best if allowed to settle for a half-hour before cutting. Well,
maybe twenty minutes.
Oh, the
twelve-gauge shotgun? That’s to keep people away from the
bread until it’s cool enough to cut.
Contact
Karen
(Messages are forwarded by The
Preservation Foundation.
So,
when you write to an author,
please type his/her name
in
the subject line of
the message.)